
FAQ
1.Q: How to configure the WIFI for the first time?
A: Connect the device to the power adapter and click “First Add”after waiting for 40 seconds, then follow the process to add the device.
2.Q: How to solve a failed WIFI configuration?
A: ① Make sure that the distance between the router and the camera is less than 16 feet.
② Set the volume of the cellphone to maximum.
③ The device only supports 2.4G network, you can turn off the 5G network if you use a dual router.
④ Please use the provided adapter to power the device.
⑤ Reset the device and the router again and reconfigure.
⑥ Please check whether the device has configured with other router, if so, please reset the device to the default setting then configure again.
3.Q: How to solve a repeated WIFI configuration failure?
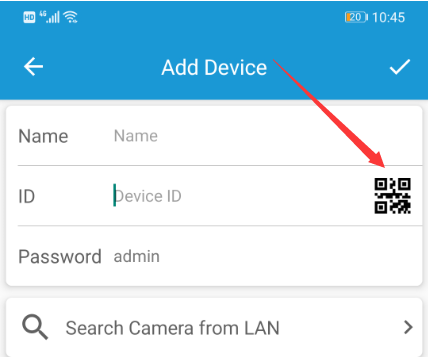
A: Please check whether the red LED light stays on. If so, please open the LizviePro application on your cellphone, choose “Manual Add”, and scan the QR code to add the device. (See image.)
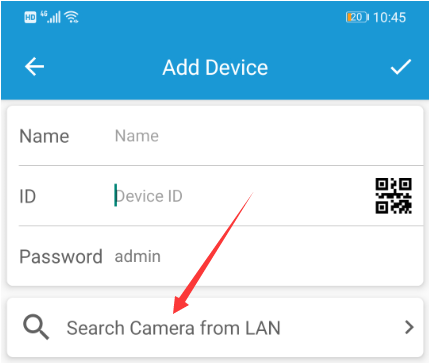
B: Please check whether the red LED light stays on. If so, please open the application, choose “Manual Add”, and click “search camera from LAN” to add the device as shown below.
5.Q: How to solve a configuration failure when using a 5G WIFI router?
A: Please connect your mobile phone to the router in 2.4G mode before configuration (or consult the router manufacturer how to switch to the 2.4G mode if you are using a dual band router)
6.Q: How to solve the video freeze ?
A: Power off the device, router and phone, and then restart.
B: Keep the device and the router within 9-16 feet and try again.
C: Please switch from HD to LD mode through the cellphone application.
D: Try to change the router channel to another channel (or consult the router manufacturer to check how to modify the router channel mode).
7.Q: How to connect the device when the QR code/ UID is lost?
A: ① If the device has already been configured with a router, please open the application, choose “Manual Add”, and click “search camera from LAN” to add the device.
② If the device is restored to the default setting, please choose“ First Add”, then scan the QR code provided below to make sonic network connection. If the configuration fails, quit the application, and reopen it, choose “Manual Add”, and click “search camera from LAN” to add the device.

8.Q: How to check the camera LED status
A: ① Blue LED Light: a.) not illuminate: no power b.) illuminate: powered c.) blink: activated.
② Red LED Light: a.) not illuminate: no power b.) illuminate: done for connection c.) blink twice/seconds: waiting for the connection d.) blink quickly: abnormal for WIFI.
9.Q: How to watch the videos of SD card files on the computer?
A: For Window system, use PotPlayer player.For Mac systems, you need to use video converter to convert SD card video files from H.264 to MP4, AVI and other formats.
10.Q: Why the video quality is not clear?
A: Please switch LD to HD mode in the APP.
B: There is a black lens cover in front of the camera, which will weaken the image quality to a certain extent, and it is a normal phenomenon.
11.Q: How to change the camera password?
A: The default password of the device: admin.
B:Change to another password in the setting menu.
12.Q: What should I do if I forget the password I set before?
A: You need to reset the machine manually. Click“First Add”, and follow the process to add the device.
13.Q: How long does it take to fully charge the cell phone battery?
A: It is about 4 hours, but the actual charging time may vary depends on the different phones.
14.Q: Why in the same times I can hear both the noise and the microphone audio?
A: Please turn the microphone volume down via the APP.
15.Q: How to correct the clock time and week?
A: Press 【Mode】to enter the clock setting, the hour LED will flash, press 【Up】 and 【Down】 to set the hour. Then press【Mode】 again, the minute LED will flash, press 【Up】 and 【Down】 to set the minute.
After finishing the time setting, press【Mode】again, the week LED will flash, press 【Up】 and 【Down】 to set the week. Finally, press 【Mode】, the time and week setting finish.
16.Q: How to set the alarm clock?
A: Long press 【Up】 for 3 seconds until you hear a beep of Di”, the hour LED will flash, press 【Up】 and 【Down】 to set the hour, then press 【Mode】, the minutes LED will flash, press 【Up】 and 【Down】 to set the minute, finally press 【Mode】, the alarm setting finish. (The other two alarm clocks can also be set like this)
17.Q: How to change the brightness of LED Lights?
A: There are Low, medium and high of three levels brightness for you to choose. The default brightness is low. Long press 【Up】 for 5 seconds until you hear a second beep of “Di”to release the key, the brightness will be high. And long press again for 5 seconds it will turn to the medium.
18.Q: How to cancel the alarm?
A: Long press【Down】for 3 seconds until you hear a beep of “Di” to cancel the alarm.
19.Q: How to change the time format?
A: Press 【Up】to switch to “12 hours” mode, or press 【Down】to switch to “24 hours” mode .
20.Q: How to turn off the alarm ?
A: Tap the clock slightly or press any button on the clock to turn off the alarm.
21.Q: How to reset the clock ?
A: Press 【Reset】until you hear a beep of “Di”, the clock is restored to factory default setting.
22.Q: How to turn on/off the LED screen ?
A: Press 【Mode】 until you hear a beep of “Di”, the screen turn off. Press any button to turn on the screen.
23.Q: How long does my SD card can record ? And it is loop recording?
A: Yes,it is loop recording.If your camera is running Full Time recording,one 32G SD card can record about 4 days.If the SD card is no space for new video,it will erase the oldest video to save the newest.
24.Q: How to configure network for a mobile sharing hotspot?
A: Connect a cell phone to the hotspot shared by another cell phone (note: the device does not support 5G hotspots).Connect the device to the power adapter and click “First Add”after waiting for 40 seconds, then follow the process to add the device.